|
Aaron Koressel |
Home | Animation | Tools | Links | Contact | ||
|
|
||
Maya Scripts and HotkeysThis tutorial will teach you how to work with scripts in Maya. It will also show you how to assign script commands to keyboard shortcuts, otherwise known as hotkeys. Downloading ScriptsWhen you download a script (from this site, or elsewhere), you should be asked to save the .mel file to a specific location. If for some reason your web browser is just displaying the contents of the script, go to File > Save Page As... (in Firefox), or File > Save As... (in Internet Explorer) and make sure that it saves as a .mel file. You need to save the script to a folder that Maya automatically checks when it starts. There are a few of these folders that qualify, but you will probably want to save it to your Maya user directory. On Windowsm this defaults to one of two locations:
...\My Documents\maya\scripts
...\My Documents\maya\8.5\scripts The "8.5" above corresponds to a Maya version number. Maya will always load the generic script directory (the first path), and the version specific directory (the second path). This was designed so that you put scripts that only work with a certain version of Maya in it's version specific folder, and scripts that work in all versions, in the general folder. Of course, you probably won't know what versions of Maya the script is compatible with, but this is rarely an issue (unless you have a really old version of Maya). I'd pick one place and stick to it, so you know where all your scripts are. Executing Commands 1) Open the script editor from the icon on the bottom-right corner of the screen, or by the menu Window > General Editors > Script Editor.
 2) Type the command into the bottom panel.
3) Press Ctrl-Enter to execute the command. 4) If the command returns a result it will appear in the top panel. If you're on Linux or a Mac, it may not be so clear where scripts go. On Windows too, it's possible to change Maya's default location, so My Documents may not be it. Maya has a command for checking what this directory is:
internalVar -userScriptDir;
See the sidebar "Executing Commands" for help on how to run that command. Running ScriptsOnce you have the script in the right location, Maya needs to load it into memory. This happens automatically when Maya starts, so if you downloaded the script with Maya open, you need to restart Maya. There's a quicker way around this though. Run the following two commands:
rehash;
source ackPushPull.mel; Rehash looks for new scripts in the script directories. Source loads a specific script into memory, in this case ackPushPull.mel. Once these two commands are executed, you've accomplished what restarting Maya would do, and you can now use the scripts. Every script has a command that needs to be run to do what the script advertises. This command can be wired to a keyboard shortcut, or stored in a toolbar, a menu, or a marking menu. It can also just be typed in into the script editor like the commands above. Let's start with that to make sure everything is working, and to understand commands better. The command is almost always the name of the script file without the .mel extension. So with our example script ackPushPull.mel, the command is ackPushPull. It's worth looking at the script or the script docs to know for sure though. In this case, there's extra info that goes with the command. Opening up ackPushPull.mel in a text editor, or going to the docs section of the script online, shows us exactly what commands are available under the Syntax section:
SYNTAX:
ackPushPull "push"; ackPushPull "pull"; So this script has two commands corresponding to the two modes it can run: Push mode, and Pull mode. Technically this second part is called an argument. What's important to know is that these two lines are two separate commands that will be two different keys, or two different toolbar buttons. Execute the command in the script editor to see that it works:
ackPushPull "push";
Remember, this script needs a graph editor open with keys selected to work, otherwise nothing will happen. HotkeysNext, I'll show how to assign a command to a keyboard shortcut - or what Maya calls hotkeys. Keyboard shortcuts are the way in which I use these scripts, and are what they were designed for. The commands can certainly sit on shelves or marking menus if you don't use them frequently, but I won't be getting into how to set that up here. Please see the Tool Design Philosophy for more info on what's important about keyboard shortcuts.
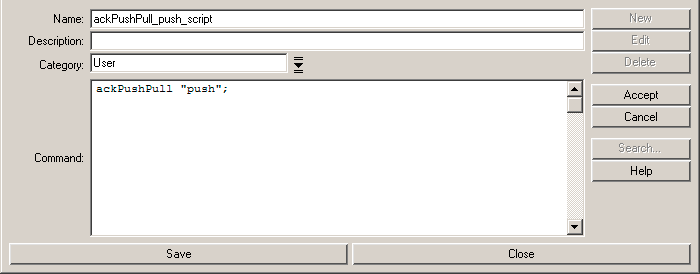
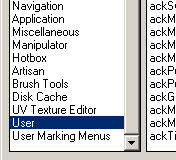
2) Navigate to the "User" category. All hotkeys are placed under a category. It doesn't matter which category a hotkey is assigned to, but by always using the User category, you can quickly find all the hotkeys that you've made. 3) Next, click New in the bottom-right corner. This is where you enter a new command. 4) Give it a name. This has no affect on the command, and merely indicates what will display in the Commands list above. I usually give it the name of the actual command with quotes stripped away and "_script" added to the end (because it won't let you type the same name as the command). 5) Type the actual command that you found in the Syntax section of the docs. This will be for one hotkey, so only give it one command. If you want a hotkey that does more than one command, you can actually put as many commands as you want in this box. It's also common practice to paste the entire script from the file into this box instead of keeping the script in separate files. I don't recommend this though - See the appendix section Why Run Scripts From Files? for a discussion on this matter.
6) The result should look like this. Click Accept to create the Hotkey command. 7) The command is now added to the Command list in the User Category. But we're not done yet, next you have to choose a keyboard shortcut. Look to the Example section of the script docs to see a recommended usage, or even better choose a shortcut that fits well with your configuration. It goes without saying that I'm not recommending X as the shortcut key as seen in the script demo - I only mean to hint at a vast potentiality that only an X could convey. 
8) I'm going to go with Alt-* for this example. The Direction will almost always be Press, but use Release if you need a separate script to execute when releasing the key. ackShuttleControl uses this for it's timeDraggerDeactivate. Clicking Query will tell you if this shortcut has already been assigned. Clicking Find will take you to the conflicting command. Finally, if everything checks out, click Assign to assign the shortcut. That's it. You've assigned a hotkey. Now pressing Alt-* will execute the Push of ackPushPull. Next, I'd go back to Step 3 and assign Alt-/ to ackPushPull "pull". Why Run Scripts From Files?It's entirely possible to paste the contents of a script into the command section of the hotkey editor, and not bother with downloading the .mel file to a location on your hard drive. In fact many people do this so they don't have to keep track of a script directory. If you want to run ack scripts in this way, there is one thing you have to do. You must add the command itself to the last line of the script. So for example: You've just pasted in all of ackPushPull.mel into the hotkey command section. Scroll to the very bottom, add a new line, and type:
ackPushPull "push";
Or whatever script command this hotkey is supposed to be. Now having told you how to make it work, I don't recommend it. Maya will run slower by doing it this way. Normally when Maya starts, it executes the procedure definition of each script file. This tells Maya what to do if the associated command is executed. By attaching this procedure definition to a hotkey, you are both defining the procedure and executing the command every time you press the hotkey. This is extremely inefficient and has a very real chance of slowing down Maya's responsiveness. Let Maya load the procedures at startup once and only once. Then when you press a hotkey, you are only executing it's command, not redundantly redefining it. The main benefit to pasting is that all your scripts travel with your preference files, and you don't have to keep track of a scripts directory. This is somewhat of a fallacy however. You still have to transport the Prefs directory for your preferences to remain intact, so it's hardly an inconvenience to include the neighboring script directory as well.
All content, unless otherwise noted, are licensed under a Creative Commons BY-NC-SA License - 2024 Aaron Koressel
|
||
|
|
||
 1) Bring up the Hotkey Editor under the menu Window > Settings/Preferences > Hotkey Editor.